
Pruning Pecans: Working With Tree Biology to Meet Your Orchard Goals
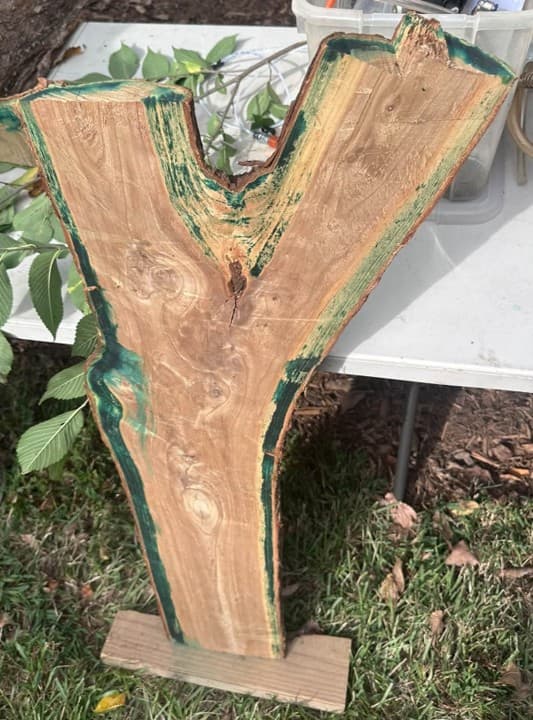
Image 1. Conductive sapwood (photo courtsey of Paul Ahlen)
Start with your goals!
There are many ways to prune a tree, and the right one depends on what you want from the tree and the property. Before anyone picks up a saw, every pecan producer should be able to answer one question: what are the short-term and long-term goals for these trees?
Orchard pruning, the style used on apples, peaches, and citrus, keeps trees short and spreading. It also encourages epicormic sprouts, the upright shoots that stand up off a branch like candles on a candlestick. Those sprouts often bear bigger, better fruit, which is why the practice continues. It is worth recognizing, though, that those sprouts are a stress response.
Shade tree pruning works with the tree’s biology so it can compartmentalize and seal pruning wounds as quickly as possible and prevent stress growth responses. In the landscape, liability is a big part of the reason. An open wound is an entry point for decay fungi, and decay can lead to branch and stem failure. On a small fruit tree, a failed branch is a nuisance. On a large pecan, a failed scaffold branch can injure workers, damage equipment, and take out part of a neighboring tree.
Pecans sit in an awkward middle ground. Historically, they were pruned more like shade trees. Because they grow so large and begin shading one another, many growers now use more fruit tree orchard-like methods. Neither approach is wrong. Each produces a response in the tree that can be beneficial or detrimental, depending on your goals.
In a perfect world, we would have pecan selections with a narrow, columnar form or a compact, apple-sized habit. That is not the world we live in, so we work with the trees we have.
If you intend for your grandchildren or great-grandchildren to harvest from these trees, prune to keep decay out of the trunk and scaffold branches. If maximum nut production and light penetration come first, and you are comfortable removing and replanting trees earlier than their natural lifespan, faster methods such as hedging may meet your goals. There are no solutions, only trade-offs. Look at your pocketbook and your property plans, and decide accordingly.
What is inside a branch
Recommended pruning practices make sense once you understand tree biology and how they respond to mechanical wounding (Shigo and Marx 1977). Trees are unique among plants because they add secondary growth, increasing in diameter and length. Secondary growth is possible because of the vascular cambium, a secondary meristem only a few cells thick.
From the outside in, a stem or branch is made of these layers:
- Outer bark (periderm). Cork and the cork cambium that produces it. This layer protects the tree from injury and water loss.
- Inner bark (phloem). Carries sugars and other photosynthates made in the leaves to the rest of the tree, both up and down.
- Vascular cambium. The green layer you see when you peel back the bark on a twig. It produces phloem to the outside and xylem to the inside. Wood is xylem, so a trip to the lumber yard is really a trip to buy xylem.
- Sapwood. The younger, outer growth rings. Sapwood conducts water and minerals from the roots to the leaves and stores carbohydrates, water, and other reserves. It contains living parenchyma cells, which is why it can respond to wounding (Image 1).
- Heartwood. The darker center found in many species. It no longer conducts or stores reserves; its job is structural support. As it ages, it becomes chemically altered in ways that often make it more decay-resistant. Not all trees form heartwood.
- Pith. The very center of a stem, branch, or root.
Rays run from the inner bark to the pith; they are rows of living parenchyma cells that store reserves and move materials sideways across the stem. Parenchyma cells can also give rise to new tissues, including water sprouts.
Each growth ring represents one year. Within a ring, you can usually see springwood, laid down in spring around the time of shoot elongation, and summerwood, formed later in the season. In hardwoods, the pores you see in a cross-section are vessel elements, the main cells that move water upward. In ring-porous species, most large vessels are in the earlywood; in diffuse-porous species, they are spread throughout the ring. Pecans are considered ring-porous to semi-ring-porous (Meier 2026).
Growth rings crossed by rays divide the wood into a three-dimensional grid of small compartments. Those compartments are the key to how a tree defends itself after a pruning cut.
Why does this matter for pruning? Every branch you remove takes sapwood, and with it the stored food the tree has banked. It also breaks the continuous column of water moving up the stem. The goal of any pruning job is to remove as few leaves as possible in a season. More branches left on the tree means more total growth, even if individual shoots are shorter.
Trees seal; they do not heal
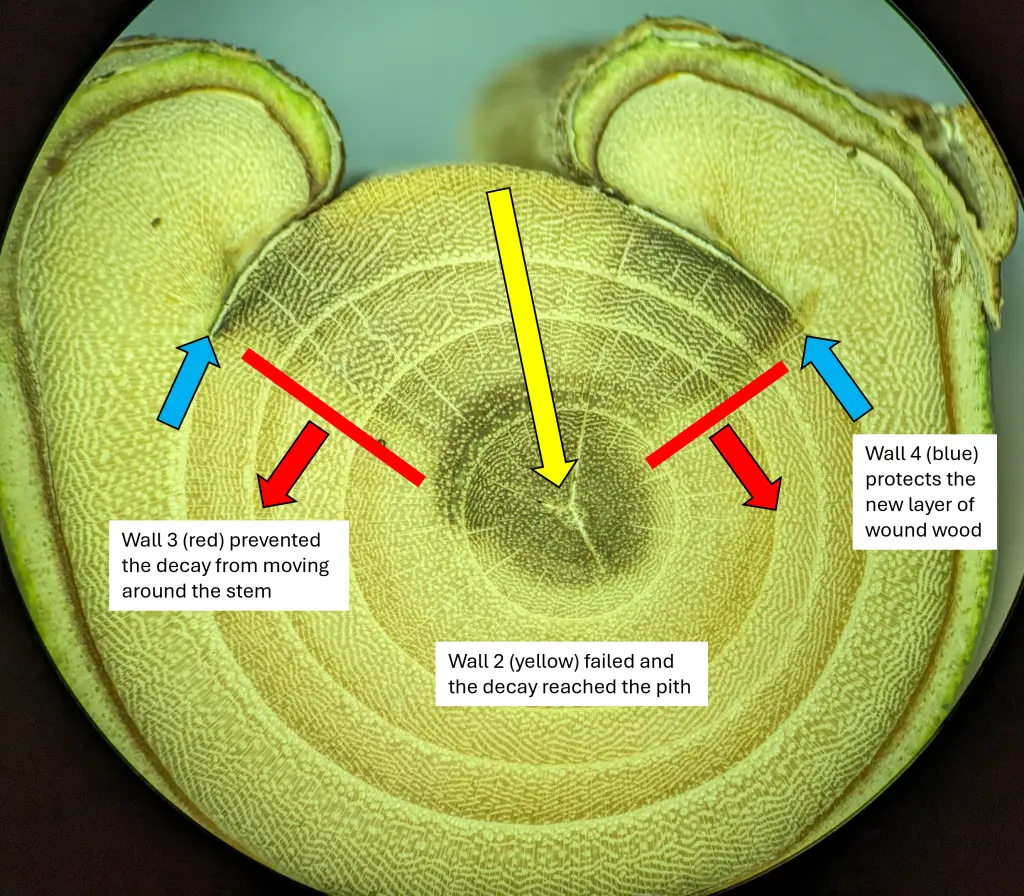
Image 2. CODIT walls. (Photo courtsey of Stephanie Adams)
A tree cannot regrow tissue that has been mechanically wounded. It will always carry that wound. What it can do is wall off the damage and grow new wood over it. Anyone who has cut through an old trunk and found a buried pruning cut has seen this in action.
Dr. Alex Shigo, beginning in the 1960s, was a tree biologist who developed a model of how trees respond to pruning and other injuries. His model, called CODIT (Compartmentalization of Decay in Trees), is one of the most important concepts in arboriculture (Shigo 1977). CODIT describes the four walls a tree forms after injury, and pruning is a type of injury.
The reaction zone (Image 2) is the weaker of two defensive zones and is made of three walls in wood that already existed when the wound was made:
- Wall 1 resists decay spreading up and down the branch or stem. Plugging the vessels is part of this. When the water column breaks, neighboring parenchyma cells push balloon-like outgrowths, called tyloses, into the vessels and seal them off.
- Wall 2 resists decay spreading inward, across the growth rings, toward the center.
- Wall 3 is formed by the rays and resists decay spreading sideways around the circumference.
Depending on the species, the tree’s health, and the decay organism involved, these walls fail fairly regularly. On a cross-section, you can often tell which walls failed.
The barrier zone, wall 4, is the stronger zone (Image 2). The cambium forms it in the first new wood laid down after the injury, and it keeps decay from moving outward into the wound wood (often called callus) that is closing over the wound. Wall 4 is chemically strong but structurally weak, and an aggressive decay fungus can still breach it.
CODIT explains why so many trees rot from the inside out but remain standing (Shigo 1979). The decay organism overcame the inner walls and moved toward the pith, while the barrier zone kept it out of the newer wood. It also explains spalting in lumber. Those dark lines can be where two incompatible decay fungi meet and fight chemically, or where the tree laid down defensive chemicals to stop an invader.
Not every dark stain is decay. Freshly exposed wood oxidizes and browns like a cut apple, and discoloration can also come from microbes moving into the site. The tree and the organisms around it are in constant chemical interaction.
Making the cut: let the tree tell you where
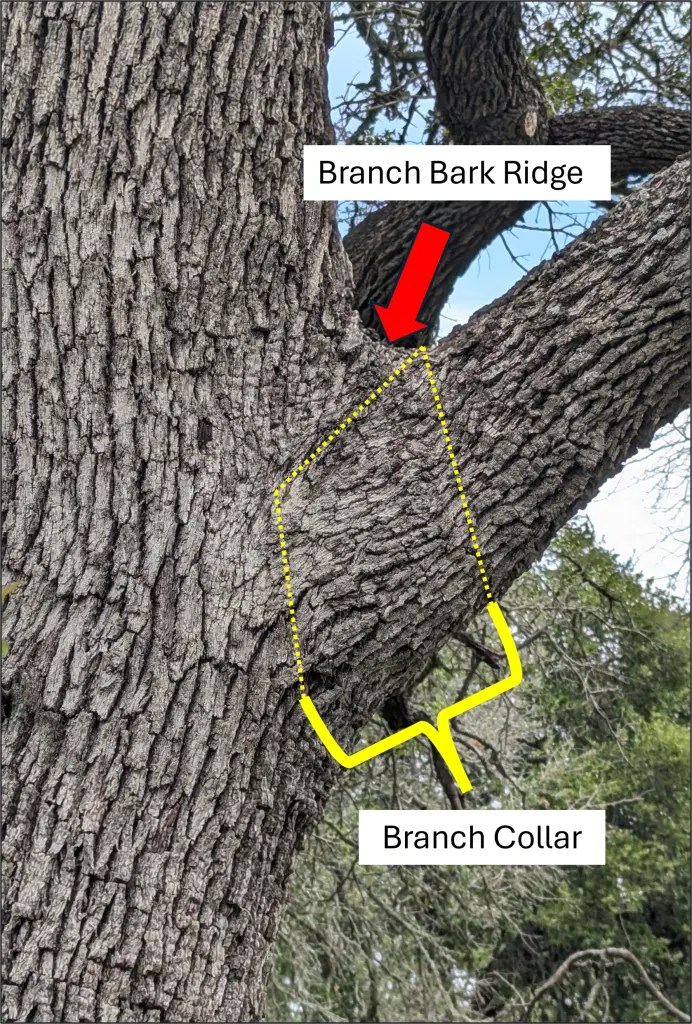
Image 3. Branch collar and branch bark ridge. (Photo courtsey of Stephanie Adams)
I am often asked where to make a pruning cut. My answer is, “wherever the tree tells you to.” Most branches have a slight swelling at their base called the branch collar (Image 3), where branch and stem tissues interweave to form a strong attachment. In the branch union (formerly called the crotch), the raised line of bark is the branch bark ridge (Purcell 2015). Inside the collar is the branch protection zone, chemically and physically modified tissue that slows decay from moving into the trunk.
The final cut goes just outside the branch collar. Two mistakes are common:
- Flush cuts go straight down along the stem and remove the collar. The collar may never fully seal, leaving a persistent open wound.
- Stubs leave a piece of branch behind. The tree must either wait for the stub to rot and fall away (Image 4) or grow wound wood up and around it (Image 5). Both take time and energy and keep the tree vulnerable to decay.
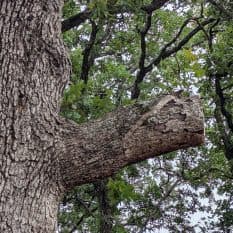
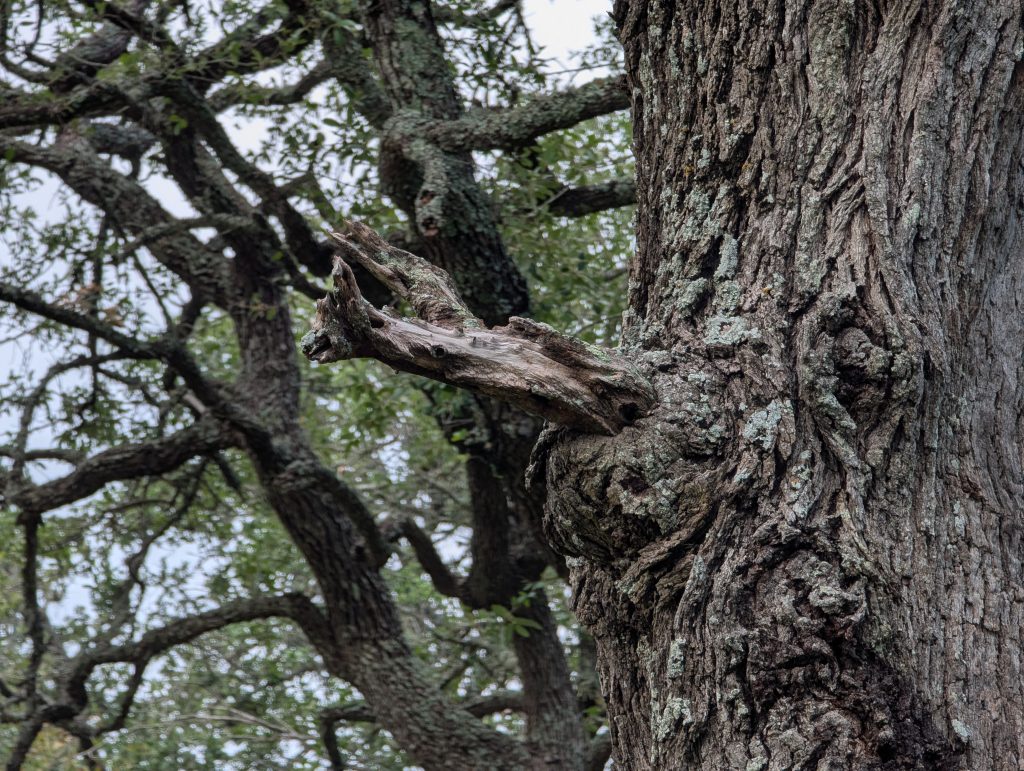

A good cut leaves a smooth surface with no jagged edges or torn bark (Image 6). Good cuts take less energy to seal, seal faster, and keep decay out, so the tree stays structurally sound longer.
The three-cut method
For any branch with real weight, use three cuts:
- Undercut. About 8 to 12 inches from the branch collar, cut one-third of the way through from the underside (Image 7).
- Relief cut. Two to four inches beyond the undercut, cut all the way through from the top. The branch drops, and its weight is gone.
- Final cut. Remove the remaining stub just outside the branch collar.
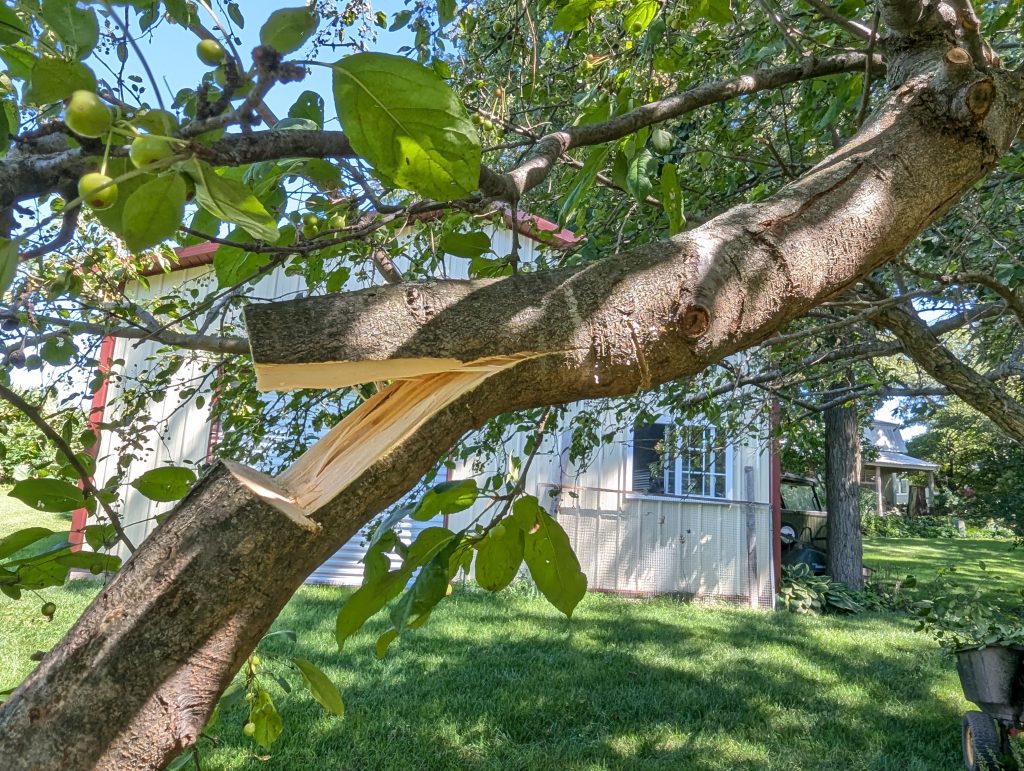
Without the undercut, the weight of a leafy branch can pull it down before the cut is finished, tearing bark and wood down the stem and leaving a much larger wound (Image 8).
Cuts larger than about 3 inches in diameter, especially on older trees, are slow to compartmentalize. On large mature trees, they may never fully seal. Keep them to a minimum.
Tools
Use sharp tools, whether hand pruners, loppers, a handsaw, or a chainsaw. Dull blades leave frayed edges.
- Pruners and loppers. Choose bypass blades, which pass each other like scissors. Anvil-type pruners have their place in grafting and nursery work, but they crush and pinch tissue, which can damage the branch collar and slow sealing.
- Handsaws. A good arborist saw has a curved blade with teeth that cut on the pull stroke. Bow saws work in a pinch but are hard to maneuver into the canopy for a clean cut at the collar. A quality handsaw will last decades if you replace the blade periodically.
- Climbing spurs. Most orchard work is done from bucket trucks, but if you climb, never use spurs on a tree you intend to keep. Every spike is another wound to seal.
Structural pruning: build the tree while it is young
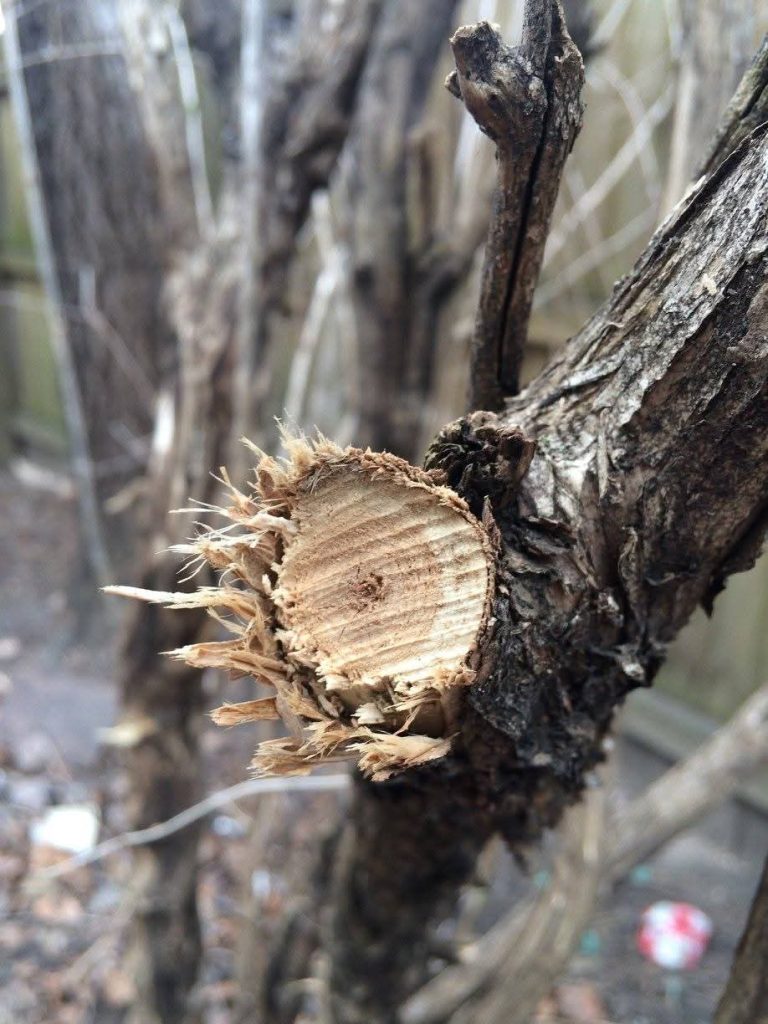


Structural pruning removes defects before they become liabilities, chiefly codominant stems and narrow, V-shaped branch unions (Image 9). It reduces the chance of failure at maturity, so trees stay productive longer. If you want trees producing for decades, this is where to invest.
Codominant stems are forked stems of nearly equal diameter arising from the same point. They lack a normal branch collar and branch protection zone, making the right place to cut harder to find. They often trap included bark (Image 9): as the stems grow, bark gets pressed between them instead of being absorbed, so they never truly join. Two stems push against each other with little wood holding them together, and that’s where we see the worst storm damage and rot.
The fix is subordination pruning. Shorten one of the competing stems to take away its apical dominance and let the other become the leader. Once the subordinated stem is about one-third the diameter of the dominant one, it can be removed with more efficiency. Subordinating and waiting is far better than removing a stem while the two are equal in size.
Ideally, scaffold branches attach to the trunk at a wide, U-shaped angle (Image 3), which allows a proper branch collar to develop without included bark.
Timing and spacing
Train trees during their first 15 years, pruning about every three years. By then the scaffold branches should be set, and later work is mostly peripheral. When you plan, picture where each branch will be in 20 or 40 years. If you do not want a branch there long term, remove it as a 2-inch branch on a 10-year-old tree rather than a 20-inch limb on a mature one. Young trees grow fast and seal wounds quickly; older trees grow slowly, so wounds stay open longer.
Scaffold branches are the permanent limbs that form the canopy’s architecture. Lateral branches attach to them and are long-lived, if not permanent. Trees also carry temporary branches and twigs that last a few seasons and are shed naturally, which is perfectly normal. When thinning laterals, aim for a well-spaced interior with foliage evenly distributed across the canopy so the tree looks balanced.
As a guide for proportions, the live crown should make up about two-thirds of total tree height, and at least 60 percent for deciduous trees (Image 10), with clear trunk making up the rest. Keeping lower branches longer helps the trunk develop better taper and strength.
- What structural pruning buys you
Light. Strategic thinning lets light into the canopy and keeps interior foliage alive longer, supporting nut production and carbohydrate storage in the scaffold branches, trunk, and roots. - Airflow and scab. An open canopy dries faster, creating conditions less favorable to pecan scab and potentially reducing fungicide needs.
- Wind resistance. A well-structured canopy lets wind pass through rather than acting as a dense sail, reducing storm damage in hurricane- and tornado-prone areas.
- Lower costs later. A well-trained tree is easier and cheaper to prune when it is large.
A good pruning job, especially on a shade tree, should be nearly invisible to the untrained eye. If the change is night and day, you likely removed too much that year.
How much, and when
No more than 20 percent a year
The general rule is never to remove more than 20 percent of a tree’s live canopy in a single year (Gilman 1997). Some standards allow up to 25 percent; I lean more conservative, at 15 to 20 percent. Most trees pruned within that limit will not put on stress growth.
Stress growth looks like epicormic sprouts, also called water sprouts or suckers, erupting from branches and the trunk, often in dense witches’ brooms. Remove too many leaves and you are taking the tree’s food supply, so it flushes new shoots to make up the difference. Growing those shoots draws on stored reserves, so the tree is hit twice: less food coming in and more reserves spent. A tree that cannot rebuild its reserves lives in a deficit, and that is when canopy decline begins. Stress growth also means more pruning later to train the tree out of it.
Gilman (1997) offers a useful check: if you need to remove more than a quarter of a medium-aged tree’s foliage, or a third of a young tree’s, you waited too long to prune. For an established tree that needs major structural correction, remove about 15 percent a year over several years rather than in one heavy job. Set realistic expectations and spread training over time.
Pruning should never be done just because there is time on the calendar. Every cut is a wound the tree must defend, energy that would otherwise go to nut production. Prune with clear objectives, and match them to whether the tree is young and vigorous or older and slowing down.
Late winter to early spring
For most trees, the best time to prune is late winter to early spring:
- Decay fungi are less active, giving the tree a head start on forming its CODIT walls.
- The cuts are open just as the growing season begins, so new wood can start closing over them right away. Cuts made in July or August stay open through the rest of the season while pathogens are active, and wound wood may not form until the following spring.
- Sun intensity is lower. Pruning suddenly exposes branches and leaves that were shaded, and full Texas or Southern sun can scald them, causing bark cracking and branch dieback from the jump in bark temperature. Pruning when the sun is less intense gives exposed limbs time to acclimate.
One drawback is that cuts made as sap begins moving in spring can bleed. This is mostly cosmetic and doesn’t harm the tree, though it does represent some loss of stored carbohydrates moved from the roots and sapwood up into the canopy.
Pruning and crop load
Because pecans bear nuts on current-season shoots and tend toward alternate bearing, structural pruning that removes some interior laterals also removes some of the next crop’s flowering wood. Thinning by pruning may achieve part of what mid-season shaking does to reduce nut load, with the added benefit of improving tree structure.
Mistakes that last a lifetime
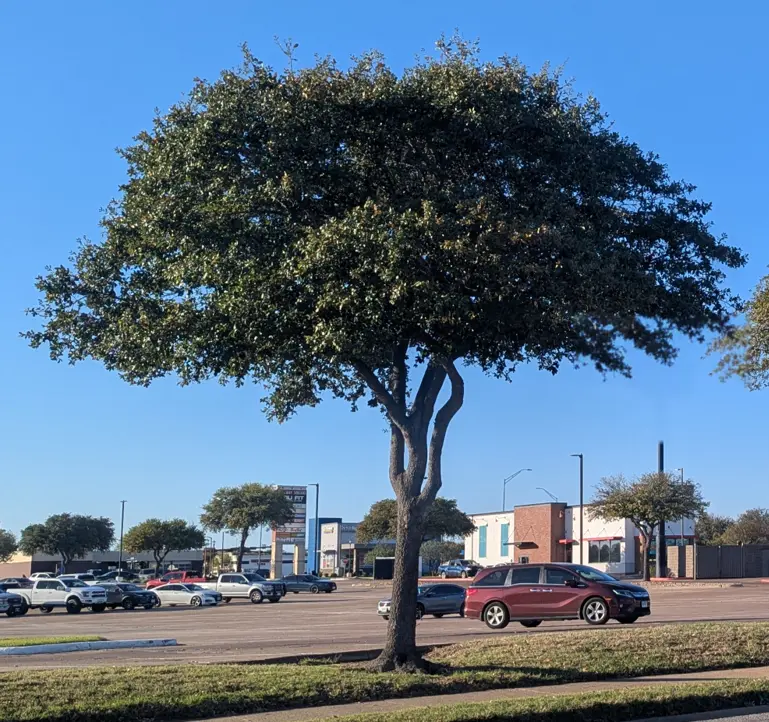
Image 10. Liontailing is a result of limbing up the branches where the tree’s canopy makes up less than 60% of the tree’s height
Improper pruning can affect a tree for the rest of its life. These are the most common culprits.
Topping and heading cuts. A topping cut is made mid-branch rather than back to a branch collar or a suitable lateral; hedging is topping. These cuts remove leaves and the sapwood reserves stored in scaffold and lateral branches. Because the cut isn’t at a collar, the tree cannot fully compartmentalize or close the wound, so it stays open longer and becomes more vulnerable to insect infestation and decay fungi. Ironically, topping often produces more growth than proper pruning. The last 10 inches or so behind the cut sprout a mass of shoots that are frequently longer than the tree’s normal annual growth. Those shoots are weakly attached and become a failure hazard as they gain mass.
Lion tailing. Also called lollipopping (Image 10), this involves removing too many interior twigs and laterals, leaving foliage only at the ends of the scaffold branches. You can recognize it when the live crown has dropped below 60 percent of the tree’s height. Lion tailing:
- Exposes the trunk and limbs to sunscald, bark cracking, and branch dieback.
- Stimulates water sprouts, adding to the stress the tree is already under.
- Increases insect and disease problems.
Changes the physics of the canopy. Instead of wind passing through, dense growth at the branch tips acts like a weight on the end of a lever, raising the chance of breakage and storm damage.
Restoring damaged crowns
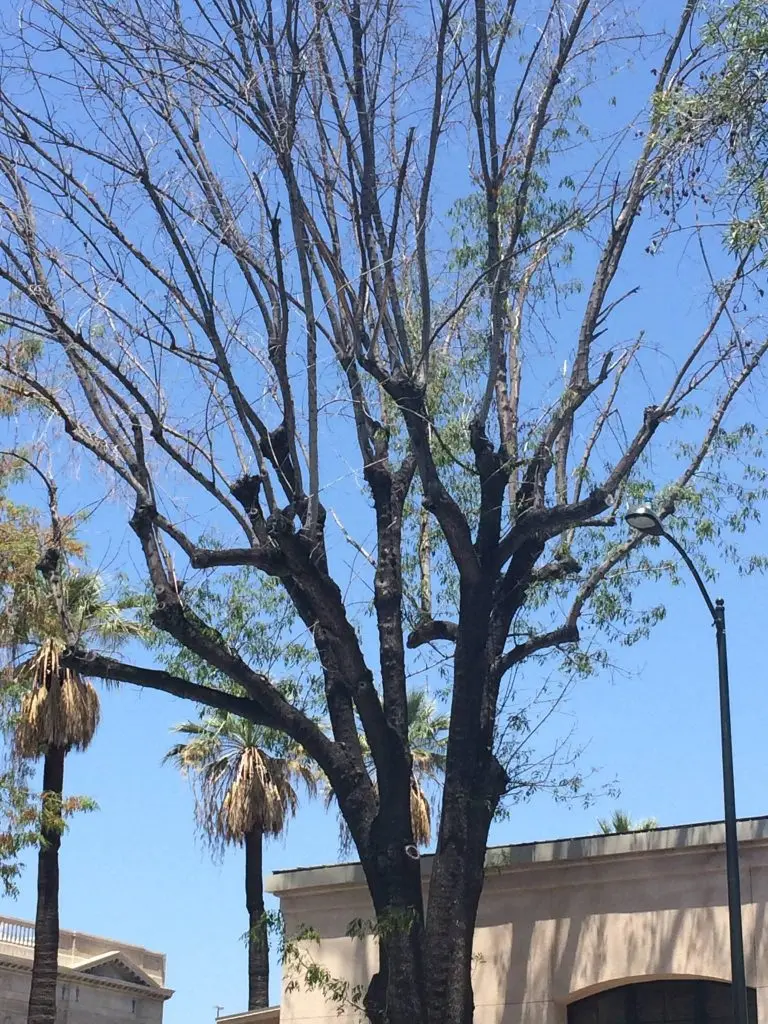
Image 11. This tree was previously topped and through restoration pruning a full and structurally stable canopy can be re-formed.
Trees that have been topped or hedged, or damaged by storms, freezes, or insects that kill branch tips, respond the same way: they try to replace lost leaf area as fast as possible with a flush of watersprouts. Over time, crown restoration pruning can reshape those trees (Image 11).
Start by leaving the sprouts alone for a couple of years. The tree is trying to rebuild its food supply, and the extra leaves help it recover. After about five years, begin evaluating the sprouts for whether they are true branches by identifying the branch collar. True branches have strong attachments and should be kept. Epicormic sprouts, which develop just under the bark from epicormic buds, have shallow, weak attachments and become more likely to fail as the branches add mass, sometimes even in calm weather.
Thin the sprouts gradually, selecting the best-attached one in each area to become the new leader and using subordination cuts to slow its competitors. Do not remove them all at once. Taking more than about 20 percent of the canopy will trigger another round of stress growth.
Hedging, selective pruning, and an idea worth testing
Hedging keeps canopies narrower, reduces shading from neighboring trees, and is fast: drive down the row and the job is done, with immediate results. The cost is that every hedging cut is a topping cut, so decay moves in sooner, and trees will likely need to come down earlier.
Other ways to get light into a canopy exist. Selective thinning of interior branches, combined with reduction pruning, opens the canopy while keeping cuts at proper attachment points. Reduction pruning, which many growers may know by its former name, drop-crotch pruning, shortens a limb by cutting it back to a lateral branch at least one-third the diameter of the limb removed (Purcell 2015). Because each cut ends at a proper attachment point, the tree can compartmentalize it. This approach takes more time, typically from a bucket, but it works with the tree’s biology rather than against it. If you want your trees around for decades and want good light penetration, this is the better route. Never give up long-term benefits for short-term outcomes.
Could pollarding work for pecans?
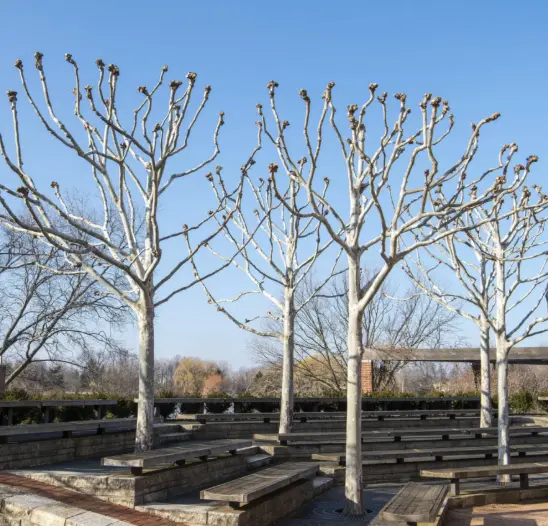
Image 12. Pollarded plane trees (Photo courtsey of Tim Johnson, Chicago Tribune, March 12, 2023)
Here is a hypothesis I would love to see evaluated. Pollarding (Image 12) is a specialty technique that is more common in Europe. Scaffold branches are established and then cut back to the same points every year, starting while the branches are small, so the tree develops rounded “knuckles” at the branch ends that sprout fresh shoots each season.
Because pecans bear on current-season wood, a pollarded pecan might be maintained for decades with little more than loppers, hand pruners, and time, while keeping canopies small enough to limit shading. Time is always the catch. Pollarding might also influence alternate bearing, since it would limit carbohydrate storage to a smaller, fixed set of scaffold branches.
A side-by-side trial of hedged, structurally pruned, and pollarded trees, tracking yield, alternate bearing, tree response, and decay over many years, would tell us which approach leaves the least decay and best serves long-term production.
The bottom line
Understanding tree biology before you prune helps optimize tree health, structure, and function while keeping decay out, which prolongs both the tree’s health and its structural stability. Whatever method you choose, hedging, structural pruning, pollarding, or something else, it must accomplish your goals. Identifying those goals now will make every decision easier later. If you want to minimize branch failure from decay, start structural pruning young and pace it over time.
Where to learn more?
ANSI A300 Part 1 (Pruning). The national pruning standard, developed by the Tree Care Industry Association under the American National Standards Institute (ANSI). It is written in legal language, so many readers prefer the companion ISA Best Management Practices for pruning, which translate the standard into plain terms.
Dr. Ed Gilman, An Illustrated Guide to Pruning. Dr. Gilman, now emeritus, wrote the book on tree pruning.
Tree Owner’s Manual, USDA Forest Service. Produced by Northeastern Area State and Private Forestry, but pruning is pruning no matter where you are. This free PDF includes a maintenance schedule covering watering after planting, mulching, staking, checking for stem-girdling roots, and pruning. I recommend the 2021 edition over the 2008 version (USDA Forest Service 2021). https://usfs- public.app.box.com/v/TreeOwnersManual
Texas A&M AgriLife Extension. Dr. Larry Stein, Dr. Monte Nesbitt, and colleagues in the Department of Horticultural Sciences have produced many excellent resources on pecan management.
References
Gilman, E. F. 1997. An Illustrated Guide to Pruning. Delmar Publishers, Albany, NY.
Meier, E. 2026. Pecan in The Wood Database. https://www.wood-database.com/pecan/ . Accessed 10/13/2026.
Purcell, L. 2015. Tree pruning essentials. Purdue Extension FNR-506-W. Purdue University, West Lafayette, IN. https://extension.purdue.edu/extmedia/FNR/FNR-506-W.pdf
Shigo, Alex L.; Marx, Harold G. 1977. Compartmentalization of Decay in Trees. US Department of Agriculture, Forest Service. 73 p.
Shigo, Alex L. 1979. Tree decay an expanded concept. Agric. Inf. Bull. 419. Washington, D.C.: U.S. Department of Agriculture, Forest Service. 73 p.
USDA Forest Service. 2021. Tree Owner’s Manual. U.S. Department of Agriculture, Forest Service. https://usfs-public.app.box.com/v/TreeOwnersManual
