The importance of pecan leaf analysis
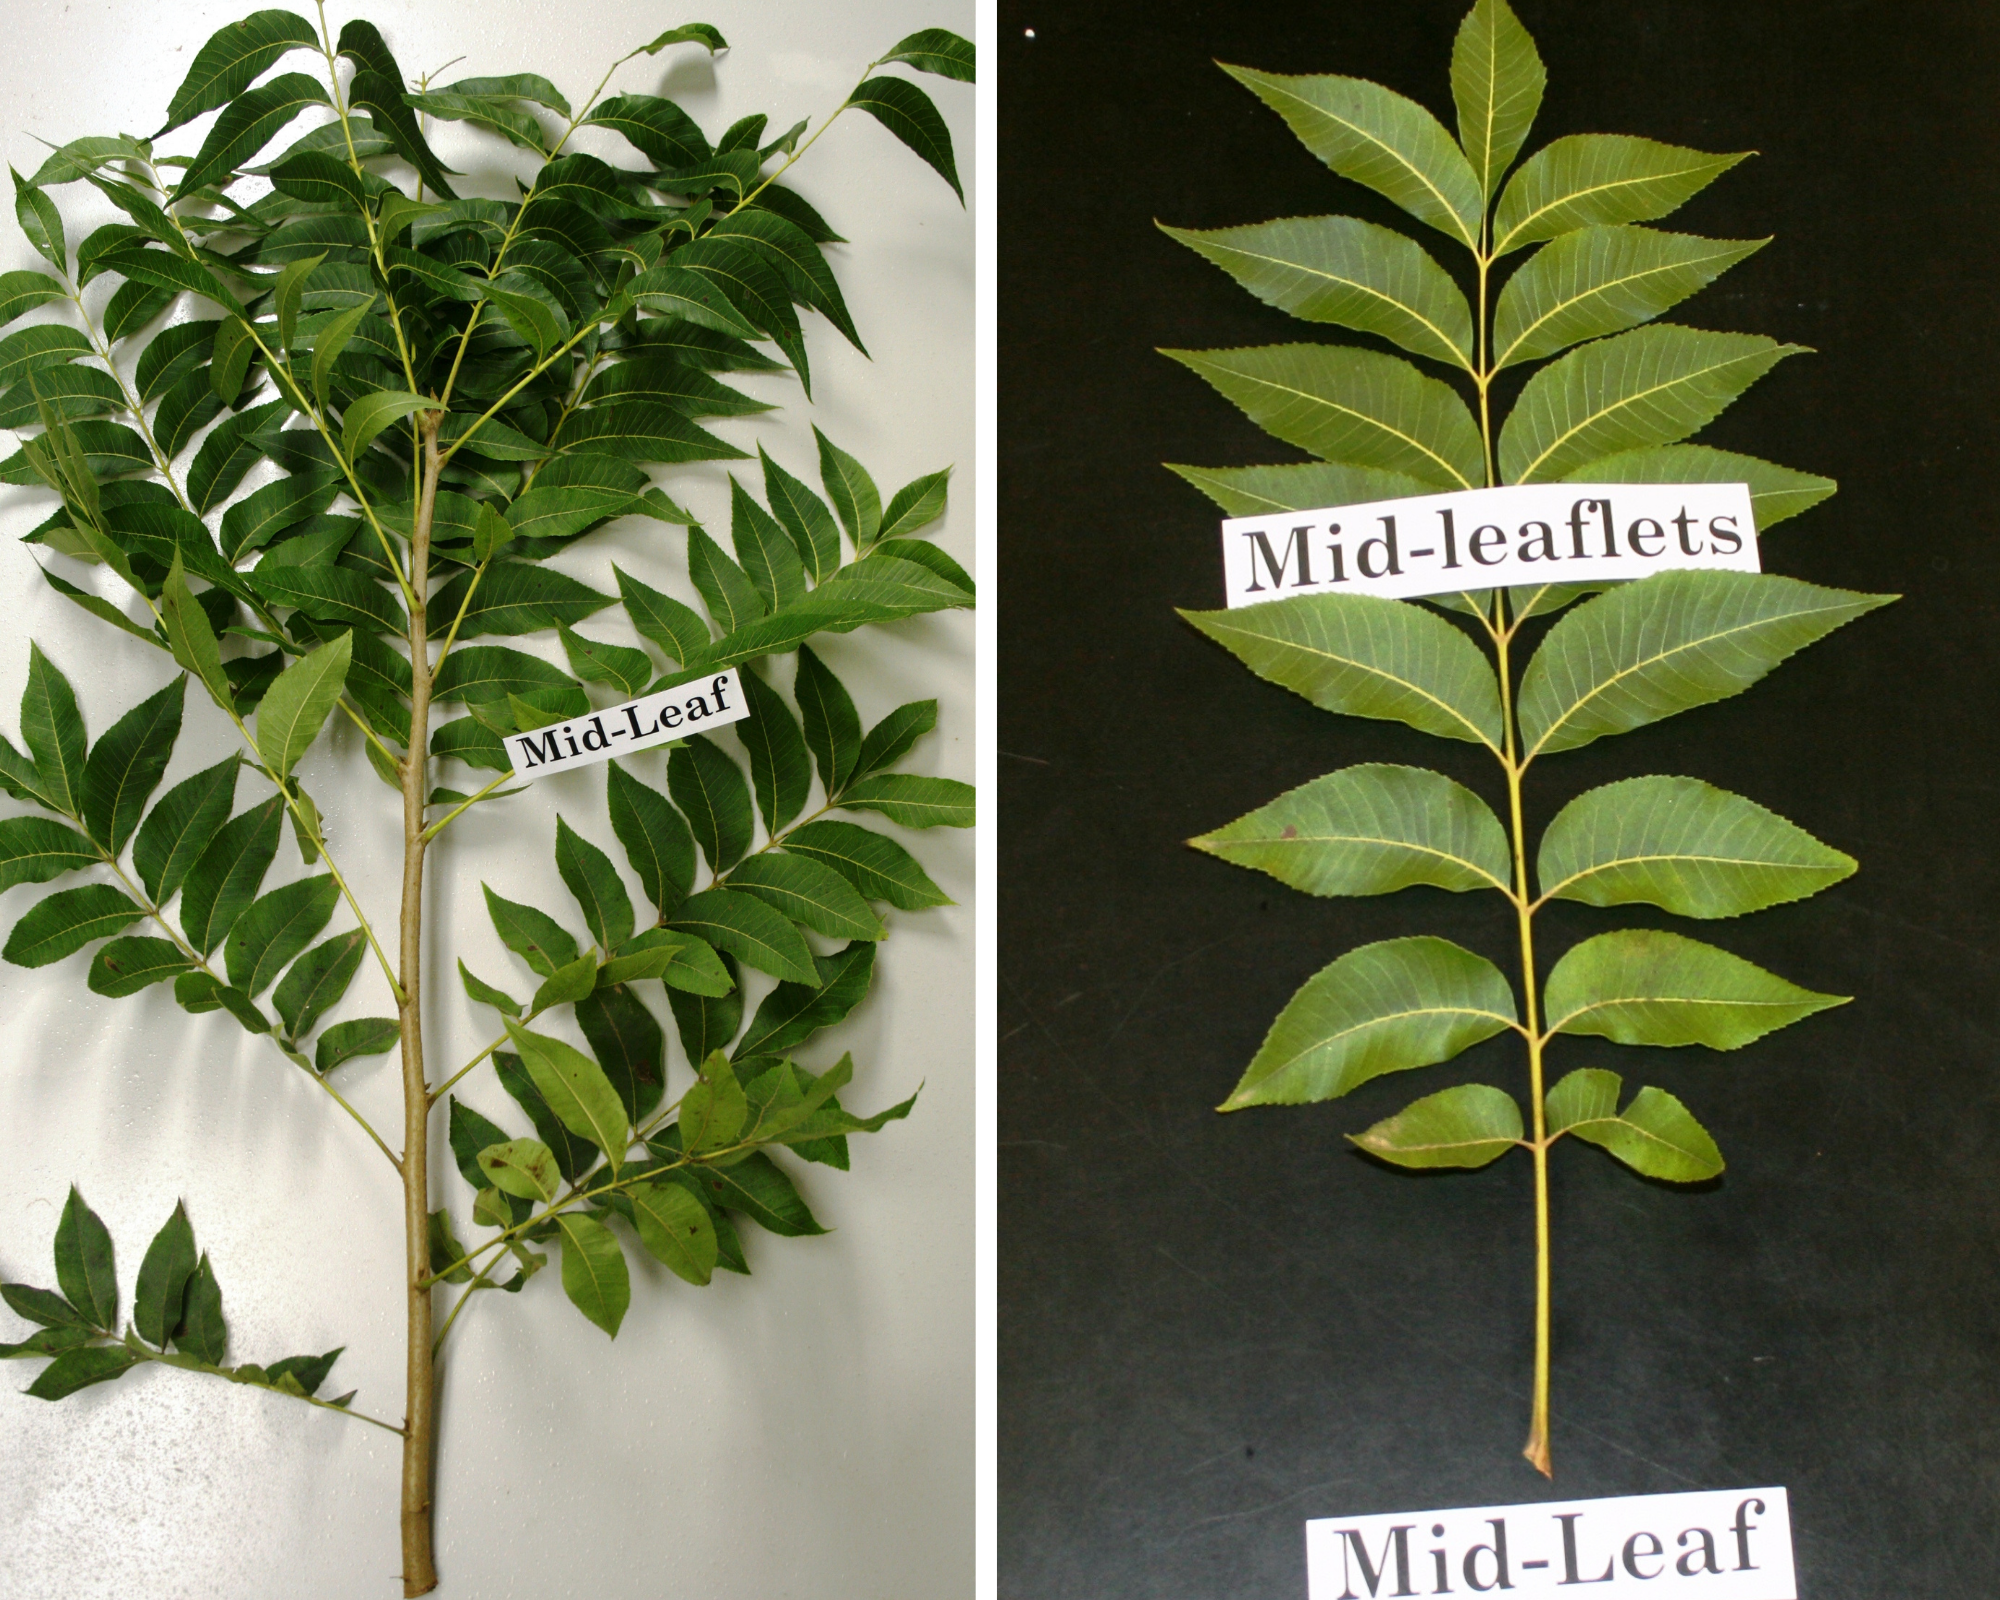
When collecting your leaf samples, select the mid-leaf of the current season's growth, then remove the two mid-leaflets from that leaf. (Photos by Charlie Graham)
No, I am not talking about attending the TPGA Conference; I know that Catherine, Blair, and the whole TPGA team have taken care of everything for that event. I am talking about taking leaf samples in your pecan orchard to confirm that your fertility program is where it needs to be to produce a good crop of pecans.
Of the many tasks a grower must manage through the year, proper nutrient management is a must for a successful pecan orchard or grove. Achieving a balance of proper nutritional levels in your trees provides the best conditions to produce a consistent crop. Management not only impacts the production of a high-quality crop but also is closely associated with the economic viability of the orchard. The increasing costs of both the actual fertilizer and application (labor, equipment, etc.) make it necessary to be as efficient as possible in meeting the trees’ nutritional needs. Applying unneeded fertilizer without knowing your orchard’s nutritional levels can be an unnecessary expense, detrimentally impact the environment, and negatively impact the health of your pecan trees.
You may ask, “How is fertilizing going to decrease the health of my trees?” For example, applying too much nitrogen when your trees are borderline deficient in phosphorus or potassium can lead to leaf scorch and tree defoliation, thereby impacting production and nut quality. Sensitive to changes in nutrient supply, leaf tissue can serve as a barometer of deficient (limiting) nutrients and excess (toxic) nutrients.
Because of this, leaf sampling is the most critical tool pecan growers have for determining their trees’ fertility needs. Soil analysis is useful to find the pre-plant nutritional needs of a prospective orchard, but once the trees are planted and growing, leaf analysis becomes the most reliable tool to determine what nutrients the roots are extracting from the soil.
Am I saying that you don’t need to take a soil or water sample after you plant the orchard? No. Using soil, water, and leaf samples together helps producers match their fertilizer applications with the trees’ actual needs and provides them with the opportunity to reduce fertilizer costs. When conducted over multiple years, these samples can help you track changes in tree nutrition, measure the effectiveness of your fertilizer management program, and modify your fertilization strategies to maximize production and profits.
Leaf analysis is an excellent tool for evaluating pecan trees’ current nutritional status and diagnosing nutrient disorders. Still, for it to be a useful tool, the samples must be properly collected, processed, and sent to a laboratory for leaf analysis. Following laboratory analysis, the nutrient data is compared to standard values developed for healthy, productive pecans to assess the current nutritional status of your orchard. To ensure an accurate assessment, growers should follow these procedures.
Leaflet samples are collected at the proper time
Concentrations of mineral nutrients in the leaves change as leaves emerge, expand, and finally senesce in the fall. For many elements, the leaf concentration becomes relatively stable from early July to early August. At this time, most of the spring flush terminals have ceased growth and leaves have matured. Producers should take leaf samples in July because critical levels established through experimentation and observation are based on sampling done during this time. A sampling program is most effective if done annually at the same time each year. This statement is true no matter how you manage your orchard: improved varieties, natives, high input, low input, regenerative, silvopasture, etc. Collect samples in July.
Does this mean that leaf samples cannot be collected at any time during the growing season? Not at all. Later we will discuss special situations for collecting leaflets at an alternative time, but for regular annual leaf tissue nutrient analysis, the appropriate collection time is July.
Know where you are planning to collect your samples
When taking a routine leaf sample, follow the guidelines set forth by Dr. Richard Heerema in an article titled “Diagnosing Nutrient Disorders of New Mexico Pecan Trees.” Heerema writes, “For routine leaf sampling, collect leaflets from each 10-acre or smaller orchard block for analysis as a separate sample…If there are different cultivars, extreme differences in soil type, or other obvious environmental zones within an orchard block, separately sample each unique area.”
Never mix leaflets from trees grown in different soil types, such as heavy clay soils versus light sandy soils. Varietal variations in nutrient concentrations of pecan leaflets make it necessary to analyze and compare different pecan varieties separately.
It is common practice to sample trees of the predominant variety in a given block. If ‘Pawnee’ is the main variety, sample ‘Pawnee;’ if ‘Kanza’ is the main variety, then sample ‘Kanza.’ Rootstock differences can contribute to some variation in the leaflet nutrient content. Also, collect samples from young non-bearing trees separately from older, bearing trees, especially if you have interplanted young trees into an older block of trees.
In an article titled “Diagnosing Nutrient Disorders of New Mexico Pecan Trees,” Dr. Richard Heerema suggests that some growers may find an additional layer of consistency by collecting leaflet samples from the same marked rows or trees every year. Collect leaflets from all sides of the tree that are exposed to sunlight and can be easily reached from the ground (in some orchards you may need to stand in a truck bed or on a short ladder) to reach appropriate leaflets.
Collect the appropriate number and type of leaflets
Take the middle pair of leaflets from the middle compound leaf of the current season’s growth (see Figure 1). Remove leaflets with a downward or backward pull so that the petiole remains attached to the leaflet. When collecting leaflets, take them from healthy, nut-bearing branches on all sides of the tree or trees if possible. If that’s not possible, you can also sample from non-bearing shoots. Remember to collect only fully developed or expanded leaves.
Depending on the state you live in or the lab you will be sending your samples, the required number of leaflets will vary. It generally falls between 40 to 75 pairs of leaflets (80-150 leaflets), but check with your extension office or the lab website to confirm the sample size required for analysis. As an example, taking two pairs of leaflets (a pair from each side of the row) from each of 25 randomly selected trees would give you 50 pairs or 100 leaflets.
Know which leaflets not to collect
The most important thing to remember during pecan leaflet sampling for tissue nutrient analyses is to stay consistent. Varying your leaflet sampling method between samples or years will make it difficult to make season-to-season or block-to-block comparisons and may prevent you from seeing or cause you to overlook important nutritional trends in your orchard blocks.
Consistency extends to the types of leaves you collect. When taking your sample, avoid leaves in the interior of the tree (that do not receive sunlight) and from suckers, water sprouts, or small twigs arising from large limbs. Furthermore, avoid those leaves with injury (insect, disease, or mechanical) or that are not representative of the sample. Samples from trees that are dying or otherwise not typical of the average orchard tree should not be included with the regular samples. Do not mix varieties into one sample. Consider also that blocks or orchards with different soil types and management practices may require separate leaf samples. Avoid sampling leaves covered with dust, such as those near dirt roads. Lastly, avoid sampling recently sprayed trees.
Use the appropriate gear to collect and transport your leaflets
When sampling, use the appropriate gear. You should not use galvanized containers, rubber gloves, or rubber sponges to collect, carry or store samples. Throughout the process, avoid contact with materials that may contaminate the samples. Be sure the containers or bags you use to keep your leaflets as you collect them are clean. You can store leaf samples in plastic bags on ice or in a refrigerator before washing and drying, but do not store them like that for more than one day. I have seen leaf samples in plastic bags sitting on the dash of a truck all afternoon, not a good idea.
Prevent contamination after collection by not exposing the samples to galvanized metals (which contain zinc), soil, fertilizers, or phosphate-containing detergents. If leaflets have been sprayed in the current season with foliar micronutrient fertilizers, you must wash off external fertilizer residues. If nutrient-based fungicides such as phosphites have been sprayed, the leaves will need to be washed before sending them off for analysis.
Properly cleanse your leaf samples for analysis
It is recommended that you wash leaves for accurate micronutrient analysis as spray residues or dust on leaf surfaces affect sample results. There are a number of ways suggested to clean your leaves after they have been collected in the orchard. Some examples from around the industry include:
- Dr. Lenny Wells with the University of Georgia suggests that immediately upon collection, growers “wipe leaves (entire surface; both top and bottom) with a damp cellulose sponge or cheesecloth to remove dust and spray residue,”
- The Nobel Research Institute recommends “washing or dipping the leaves in tap water for less than one minute,” or
- Dr. James Walworth with Arizona Cooperative Extension writes that producers should “gently wash fresh leaves in a dilute (2 percent) phosphate-free detergent solution for approximately 30 seconds, then rinse three times in distilled water and blot dry.”
However, I am old school, having been trained in Dr. J. Benton Storey’s lab, so I opt for a more stringent cleaning method (see Smith and Storey, 1976). I suggest the following. Wash leaves in 0.1 percent phosphate-free detergent, rinse with water, then wash leaflets with 1.0 percent hydrochloric acid (muriatic acid) solution in distilled water, followed by rinsing three times with distilled water.
Leaf samples should be hand washed soon after they’re collected and before the leaves dehydrate. Some labs will perform an acid wash for you, so check in advance to see if this is an option.
Properly dry your samples before shipping
Once you’ve washed the leaflets, blot them dry, place them in a perforated paper bag (to allow airflow), and leave them to air-dry at room temperature in a dust-free area. Do not expose the samples to direct sun or excessive heat while drying. Leaves can also be dried in a kitchen oven overnight with the oven set on warm. This would equate to drying the leaves in a 150-degree F (65° C) oven overnight or until crisp. Do not heat leaves to temperatures above 175 degrees F (79° C).
After drying is complete, place dry leaflets in a paper sample bag for transport. Do not send in fresh green leaves unless you have cleared it in advance with the analysis lab. Green leaves would need to be shipped refrigerated overnight. Do not send wet or green leaves in a Ziploc bag in routine mail, as the leaves will undergo severe deterioration before arriving at the lab.
Properly label and ship your samples to the analysis lab
Before you send your samples, you must accurately and completely identify each one with its age and variety (improved or native). If you are passing the sample along to an extension office, include each sample’s identification. Also, I advise collecting a soil sample and sending it to a soil testing laboratory if no recent soil data is available.
If you are shipping the samples directly to an analytical lab, you again want to identify them completely. Once the dry leaf sample is in its paper bag, fully label each with the date, orchard name, and sample number. You can then seal the bags with tape and ship them to the lab.
Special Case: Diagnosing growth disorders
As I mentioned earlier when discussing leaflet sampling time, sometimes it may be necessary to sample leaflets at a different time than the routine protocol. Problem trees can be compared to healthy trees by collecting leaf samples at any time. For such special cases, sample leaflets from both the problem trees and from the healthy trees on the same day, using the same collection protocol for both. You should also include a complete and accurate description of abnormalities with such samples. This sampling will give you a healthy or normal leaflet nutrient concentration at that particular time to compare to nutrient concentrations of leaflets collected in the problem area. This comparison will also aid you in diagnosing a nutrient imbalance symptom or production issue in that part of the orchard.
Familiarize yourself with nutrient deficiency and toxicity symptoms
Pecan growers should become familiar with the characteristic deficiency or toxicity symptoms caused by each nutrient, as this would aid the grower in distinguishing nutrient symptoms from insect/disease symptoms and spot problem areas in the orchard during the growing season. When evaluating nutrient deficiency symptoms in your orchard, remember that trees can exhibit multiple nutrient deficiency symptoms and insect/disease symptoms at the same time! So, the grower must be able to identify the problem before they can apply the proper solution. Note, however, visible symptoms alone are not sufficient for monitoring your pecan orchard’s nutritional status. Orchard performance typically declines before any visible symptoms appear.
For trees that are producing well, a leaf sample can detect deficiencies in the non-visible range, often referred to as “hidden hunger.” These mild nutrient deficiencies may go unnoticed by orchardists because the trees exhibit no obvious visible symptoms, and the initial slight decreases in nut production or shoot growth may not have been attributed to nutrition. Leaflet analysis allows growers to take corrective action before the deficiency results in visual deficiency symptoms and in time to avoid a large adverse effect on production.
Leaf, soil, and water analysis
Over the years, I am sure you have read many articles in which the subject matter focused on a single type of analysis (i.e., leaf or soil or water). A soil test and water test should be the first step before planting an orchard. A soil test taken pre-plant will allow for modification of soil pH and the addition of limiting nutrients to the soil. After planting, a soil test is effective in keeping track of soil pH and monitoring levels of nutrients present in the soil; however, foliar (leaflet) analysis provides a clearer picture of overall tree nutrient needs. While leaflet analysis can give you a better understanding of your trees, periodic soil analysis can help you evaluate the underlying causes behind particular nutritional imbalances in an orchard.
Quite often the different types of orchard analysis should be used together. For example, leaflet analysis of pecans growing in sandy soils in East Texas may show high levels of manganese present, but the soil analysis identifies the real problem as one of very acidic soils. Liming to increase the soil pH will reduce manganese solubility and result in lower manganese levels that are not toxic. If done properly, leaf, soil, and water analyses will help producers avoid excessive or insufficient fertilizer application rates and, ultimately, lead to more economical and efficient use of fertilizers.
Summary
As the article “Plant Analysis: A Diagnostic Tool” with Purdue University states, pecan leaf “analysis is a powerful tool for confirming nutrient deficiencies, toxicities and imbalances, identifying ‘hidden hunger,’ evaluating fertilizer programs, studying nutrient interactions, and determining the availability of elements for which reliable soil tests have not been developed.” Uniformity and consistency during the sampling process are both necessary for reliable results. Proper interpretation of the nutrient analysis is contingent on a thorough understanding of the many interacting factors, which influence any element’s concentration in plant tissue. Thus, cropping history, sampling techniques, soil test data, water test data, and knowledge of nutrient concentrations all need to be considered in the final diagnosis. When done correctly, leaf analysis can guide farmers toward the more efficient use of fertilizer investments.
